24 Dec 2015

Merry and bright !

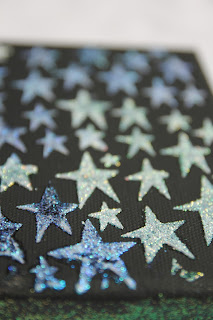
I wish you a merry and bright Christmas with a little canvas


As you can see if you move the canvas in other position , you can see the colors of the stars changes !
This is a neat little trick made using texture paste which work with a dark background (like here with black gesso) : Comic Shimmer : icicle blue sparkle and frosty dawn sparkle .


Take care of you and see you next year !

20 Dec 2015

Cards

Today , I'm showing you some cards that I  made for the end of the year .


The tutorial that I followed is from Yolande K : paper with design that you painted with white gesso (or not as you want ) + Distress ink  with water + template with modeling paste ( for the stars / template made by me) sewing the edges if you want + added some nappinks paper /embellishments in paper, tag ...all that you want. Don't forget to splash some black ink !
Easy, right?

Thank you for stopping by !
Enjoy your December month !


27 Nov 2015

The cover

The cover of the art journal is made with a canvas. I painted it a bit on the edges and gave it some texture using modeling paste ( templates :Mini tile texture from TCW and tiles (THS042) from T.Holtz collection  ) which I then embossed with embossing powder.


+ A old frame covered with tissue paper and painted + some glue dots ( Diamond galze )  and two flowers painted too and a spring.


+ Two old brushes painted


 An addition of white ink plash and a skeleton leaf


 And it's finished !

Thank you for stopping by !
Enjoy life .


18 Nov 2015

Last page

And now the grand reveal of the last page of the art journal...here it is!


The background is a simple canvas. I sprayed ink () using a stencil to get the design (Round mosaic by Toga) and stamped () the word "free" with jet black ink.(Archival ink by Ranger). Then I used a black pen ( Faber-Castell artist pen) to write the others words as well as to trace out the shape of the bird from a stencil. ( Birds/ by Diane Walkley media /Rangers )
Lastly I hand sowed on a variety of white buttons from my personal collection.


I hope you enjoy this page as much as I do!
See you soon for the final step: the cover.


31 Oct 2015

Halloween

This was made for Halloween time :
  • PLP Pumkin


  • PLP Halloween


Enjoy November  !
And see you soon.....

18 Oct 2015

Two pages

Again some pages of the art journal ( Here , Here other pages )


This one has a canvas background. I painted it with different colors of acrylic paints and wrote the lyrics of a Beth Ditto around like a frame.


This is the vis-à-vis page of the other with all the colours. I just used drawing gum to draw the circles and the tittle. I then covered everything with black gesso and afterwards removed the drawing gum. I loved the technique, it is very easy and versatile.

That's it for today.
Come again for the last page and the cover of this art journal.
See you soon.


14 Oct 2015

Pink and Yellow (2)

Today, I showing you the last three panels of the ribambelle.


 For this one , I used white paper that I colored with Distress ink ( spun sugar and scattered straw) . The birds were made using heat embossing ( Wow powder  for the pink , and mustard seed with clear embossing powder)


For the one above, I used a paper (sorry don't remenber the name of the collection)  for the background . The birds are cut using a Silhouette machine from two papers : pink cardstock  and white vellum . In addition, I stamped two words in pink.


For this last one, the background is a sheet of music paper. For the butterflies, I used modeling paste colored with acrylic pink as well as  yellow paint for the flowers . In addition, some beads are glued.

That's it for today,
Enjoy your day !
Thank you for stopping by.


24 Sept 2015

Pink and yellow (1)

Today here is another project of mine, I've split it up in two posts!
It's a gift  for a nice girl who loves pink and yellow !


For this one , I used canvas for the background . Then I colored it with Distress ink ( Scattered straw, Picked Raspberry ) , stamped it with the stamps ( hearts from Traget "Icons stamp kit" / ink Distress ink : festive berries) and after that I sewed it on the borders .


For that one, I used paper for the background and stamped the butterflies  ( rubber stamp from Stampin' up for this with flower and this with musical by Prima ) with Distress ink : festive berries. In addition, I put two metal embellishments.
That's it for today  !
Thank you for your comments and for stopping by!


8 Sept 2015

Cards butterfly (7)

Today I will be showing you the last of the butterfly frame cards!
  1.  


I put some different papers on the card + white gesso + spray ink ( Tattered Angels : aquamarine/ Dylusion, Ranger: Vibrant turquoise)


         2.


Again a stencil made with hot glue, spray ink ( Dylusions , Ranger: After midnight and Polished jade) , acrylic stamp (Prima: tea on the desk for collect moments/ Hero arts for the rounds)with black ink ( Versafine) and top of the bottle cap with Chinese ink black (small rounds clear ) .


       3.


I embossed all the card with Versamark + embossing powder (Old island stamp co brown ) but before hit gun it I make some rounds with cap of different bottles. After , that I glued some rounds that I covered with embossing powder too( Wow!: primary bark)

That's the end of this project.
I hope you liked it.
My friend loved her gift so I was very glad !!!
See you for another project soon.

1 Sept 2015

Cards butterfly (6)

Almost at the last cards !!!

1.


The first step for this one is to emboss it with a embossing folder (Echo park paper/ random dots )  and color it with , in my case, gelatos (Mango, Red  cherry, Cotton candy ) Of course for the little circles I used a mask  ! At the end , I added some gaze (colouring with inks) and some stapples before the picture.


2.


This one is simple too. Using my Distress Ink (Picked raspberry, Festive berries ) with my blending tool to mix the two colors on the background, I then added some modeling paste ( with light pink acrylic paint) at the top and bottom of the card ( Template using : The craftersworkshop/ mini tile texture)  At the end, some buttons for the finishing touch


Thank you for stopping by !
And see you soon, I hope !!!

After and now / après et maintenant (1)

 I've decided to combine the article from the end of 2023 in exchange for the on the "Le potager créatif" forum and the one fo...